Unassembled Wood and Floater Frame Instructions
Step by step instructions for assembling an unassembled wood and floater frame
While most Frame Destination wood picture frames are shipped assembled, we offer our customers the option to receive their wood and floater picture frames unassembled to save money on the cost of shipping—though they may be the same weight, a large, completely assembled wood picture frame can drive up the cost due to its bulk. Frame Destination will determine whether or not orders will be assembled or unassembled – based on the best interests of our customers, and our 100% satisfaction guarantee.
If you have questions, or specific needs, please reach out to our Customer Support Team.
Guide Putting together a wood or floater picture frame can be done in just five steps.
- 4 sides of the picture frame (the moulding)
- 4 (or more) dovetail keys
- Wood glue
- 1-lb. or smaller hammer
Position the frame

Cover a solid, flat surface with a piece of cardboard, and place the picture frame or floater frame moulding face down on top of it in the correct order. Avoid placing the frame on carpeting or a similar, rough surface as it could scratch the frame.
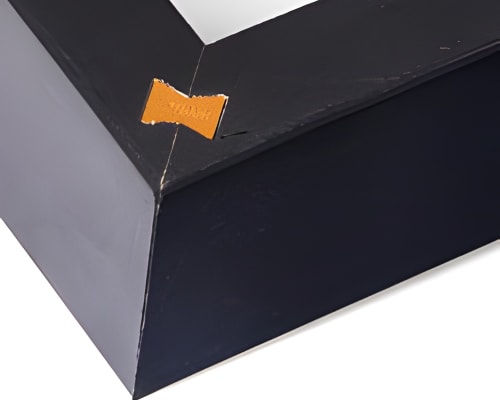
Each side of the picture frame has one or more dovetail openings routed into each corner that are only visible from the back of the frame. This is where the dovetail keys will be inserted, joining the corners.
Note that some frames may have more than one dovetail key per corner. If this is the case, start with the tallest key on the outside of frame moulding and work towards the shorter keys on the inside of the frame.
Join the first corner of the frame

Apply a small amount of wood glue to the two sides you will join. Line up the sides carefully and press them together.
Insert the dovetail keys

First, insert the key by hand, with the rounded end of the dovetail key entering first. When you have pushed it in as much as possible by hand, ensure the key is flush with the frame by gently tapping it with a small hammer. A large hammer will increase the risk of chipping the wood.
Join the final corners
Once you reach the third and fourth corners, apply glue to both corners at the same time. Note that it may be more difficult to apply glue to the final corner due to the smaller opening.
Allow the frame to dry
Let the frame dry for approximately 30 minutes. Once dry, a permanent, strong and reliable joint is created to ensure the picture frame stays together.