
How to Mount Artwork for Framing
Conservation Mounting
True conservation framing dictates that the mounted photo must be cleanly removable from the mount board. Museums must adhere to conservation guidelines, even though all acid free materials are used in these frames. Acids and other pollutants will eventually penetrate the frame from the air and walls and contaminate the frame, at which time the artwork must be removed and reframed with fresh materials.
For most of us, such extreme conservation rules are unnecessary, although care should be taken to ensure general household items such as rubber cement are not used for mounting. These items may contain chemicals that will harm your artwork immediately. There are several inexpensive mounting products available today that are safe for your artwork. Some products such as photo corners, mounting corners, and hinging tapes and tissues are all safe products for mounting your artwork.
Hinging Photograph to Mat
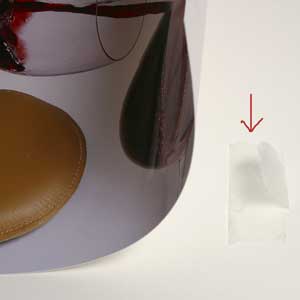
One way to mount your photograph or poster is to use acid free hinging tape or tissue such as Lineco Self Adhesive Hinging Tissue to attach the image directly to the mat. The advantage of this method is that the image will stay centered under the picture mat opening so you do not need to hinge the mat to the mount board. The disadvantage of this method is that is depending on the hinging product used, it may be difficult to change the mat. Note: If you are selling your image matted but unframed, it is recommended that you do not use this method.
An easy mounting technique: Lay your image down on a table with the top of the image hanging off the edge of the table about 1 or 2 inches. Lay your mat on top of the image and center it. Aply two pieces of hinging tissue or acid free tape to the photograph and mat from the bottom as shown in photographs. Lift the mat up with the image hanging down, place the mount board or frame backing board behind it, lay your glazing (the glass or acrylic) on top and insert into the picture frame.


Hinging Mat to Mount Board
For the remaining image mounting techniques you will need to hinge the matboard to the mount board so the mat will stay centered over the image on the mount board. It is recommended that you use a good acid free linen hinging tape such as the Lineco Self-Adhesive Hinging Tape or their Gummed Linen Hinging Tape. The gummed version requires water activation and it is more difficult to use. This version is recommended for more valuable art work.
Lay the mount board face up, and the matboard face down. Position them next to each other with their tops touching. If the mount board is thicker than the matboard you will need to place something under the matboard so it is even with the mount board. Cut a piece of linen tape almost as long as the matboard and place it along the seam between the two boards. Now simply fold the matboard up and over so that it is positioned right side up on top of the mount board.
Using Photo Corners
Photo corners will provide a little more support but they generally require that the image have a border around it on the paper it is printed on. The border allows the mat to cover up the corners. We have a variety of different types of photo corners. 5/8 inch photo corners require a ¼ inch border. The regular 1 ¼ inch photo corners require a 5/8 inch border. We also carry full view 1 ¼ corners that have a cutout that allows them to be used on photographs with a little over a 3/8 inch border.
Photo corners are a great archival photo mount for picture framing since they allow you to do your photo mounting without any chemicals coming into contact with your picture. Not all photo corners are created equal. Make sure you do not use photo corners that contain PVC plasticizers or acidic compounds. The two most common types of archival quality picture corners are made from polyester film, more commonly know as Mylar (Dupont Mylar Type D) and polypropylene.


Mylar Photo Corners are the first choice of museums and provide the clearest plastic. Polypropylene Photo Corners are not as clear as Mylar but are also inert, acid-free, safe and also widely used for mounting. Polypropylene corners also cost about half as much as Mylar photo corners.
Plastic clarity and archival ability are more of a consideration for photo albums and sleeves since photo corners are generally not visible in photo frames and have little contact with the print. Mylar is reportedly good for centuries and Polypropylene is reportedly good for decades. When storing prints under plastic care should be taken to keep the relative humidity below 80% other wise the print can stick to the plastic. This is more of an issue with the albums since photo corners to not have much contact with the print and typically and may only cover the white border if available.
Mylar, Polypropylene, and Polyethylene are all safe plastic materials and they are all odorless. This is a good indication they are not out gassing harmful chemicals. If you have your prints stored in plastic albums or sleeves that you are not certain about, a quick test is to simply smell them. An example of a harmful plastic smell is that of a shower curtain.
An alternative to photo corners is Mylar See-Thru Mounting Strips. They are used to mount the edges of the artwork instead of the corners.
Photo Corners and Archival Hinging Tissue
One of the main reasons that pictures buckle after being framed is that the image, mat, and mount board all expand and contract at different rates with changes in temperature. For this reason it is important to leave the image as free as possible to move within the picture frame. The two primary ways of achieving this are mounting with photo corners and hinging tissue . A key component of conservative framing is that the image can be completely removed from the photo frame with no change to the image. To allow the image to freely expand and contract beneath the mat, it should only be hinged at a couple of points along the top edge of the photograph. Larger images may require 3 points. How conservative the hinging method is depends on the type of adhesive used in the hinge. For true conservation, there is a special Japanese paper that is used with a water-soluble wheat or rice starch adhesive.
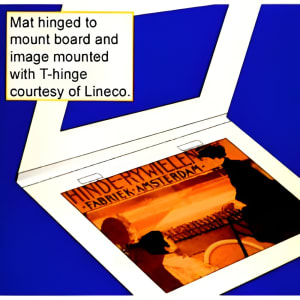
Hinging the Image to the Mount Board
There are two types of hinges: T-hinge and V-hinge. The T-hinge is all purpose. The V-hinge is used when you want the edges of your art to be visible and not covered by the mat.
T-hinge: After you have hinged the mat to the mount board (see hinging mat to mount board above), place your image under the mat and center it. Once it is centered use some paper weights to hold the image in place. Now lift the mat up and over so it is laying face down out of the way. You will need to place two hinges along the top edge of the photograph. Lift the artwork up and apply a piece of hinging tissue to the underside of the image so that is protruding past the edge of the image. It should be adhesive side up (sticking to the bottom of the image) and should not protrude more than width of the tissue. Place another piece on the other side. Get two more pieces of tissue and place them adhesive side down across the top of the two pieces of tape attached to the artwork. Fold the mat back over and you are done.
V-hinge: This method is used when you do not want the mat to cover the edges of your artwork so that they are visible. It is very similar to the T-hinge; however, it resides completely under the photograph. After you have hinged the mat to the mount board (see hinging mat to mount board above), place your image under the mat and center it. Once it is centered use some paper weights to hold the image in place. Now lift the mat up and over so it is laying face down out of the way. You will need to place two hinges along the top portion of the photograph. Lift the artwork up and place something under it to hold it up and out of the way. Take two pieces of tape and place one across the other in the form of a T. Take the long side and bend it up and over so that the adhesive is facing up. Press two of these down to the matboard under the artwork and then press the artwork down on top of them. Fold the mat back over and you are done.

Dry Picture Mounting
With this technique the image is permanently attachhed to the mount board. It is often used in cases where the image will be float mounted or left un-framed on a thick aesthetically pleasing mount board. The dry-mounting process cannot be reversed so it is not a conservative technique. Over time bubbles can form in the artwork depending on environmental conditions, and the skill level of the person. It is generally not recommended for Polaroid and Inkjet prints since both are sensitive to temperature.
Dry mounting works by placing a special adhesive tissue between the photograph and the mount board. It is then placed in a special press that will apply pressure either mechanically or with a vacuum to press the artwork against the mount board while applying a high temperature to activate the adhesive in the tissue.
Dry mounting itself does not hurt the image significantly. The primary reason it decreases the value of original artwork is that it prevents re-framing which is more of an issue for very long periods of time. The decrease in value will be much less significant for items that are not one of kind originals. It is not possible to prevent acid components from leaking into a picture frame over time and contaminating the mat and mount board. For this reason museums reframe original artwork now and then in order to completely remove those acidic compounds. If the artwork is dry mounted, then you can not replace the mount board. Long term conservation is compromised In that case, a museum will go through extra effort to keep the mount board from getting contaminated such as providing an additional backing that can be replaced and by keeping the edges of the original backing away from the edge of the photo frame.
Pressure-Sensitive (Adhesive) Mounting
Crescent makes a product called Perfect Mount. This mount board is pre-coated with a pressure sensitive adhesive. It allows you to get an effect very similar to the dry mounting technique discussed above without special equipment and temperature damage to the photograph. The adhesive side of the board is covered with a release paper. You remove the release paper and place the photograph on the board. The adhesive will not start to activate until pressure is applied so you can reposition the artwork. You will also need to make sure you remove any air from under the photograph. Once you are happy with the position you can place the release paper over the photograph to protect it and apply pressure using a squeegee or burnishing tool. The piece must be left alone for 24 hours while the adhesive cures. This technique is non-archival and since the adhesive is not very span, it might not work with thick heavy papers.
Wet Mounting
Wet mounting is similar to pressure-sensitive mounting however; you must apply wet glue or paste to the mount board yourself. Once applied, you position your artwork on the board and then cover it with something such as sheet of glass to apply a steady even pressure and let it dry for 4-24 hours. This technique is non-archival and you have to be careful not get the glue on your print.
Spray Adhesive Mounting
Scotch Photo Mount and other spray adhesives are a little cleaner and easier alternative to wet mounting. Place your photograph upside down and spray the adhesive on it. Be sure to overspray the sides, top, and bottom edges. Position the photograph on the mount board and smooth it down from the center to the edges using your hand or a brayer. Typically the spray adhesives are not as permanent as dry or wet mounting. When using spray adhesives you can cover your work area with freezer paper to catch the over spray. Aerosol-sprays require a well-ventilated work area and you should wear a respirator mask. Glue is not good for your lungs. Most of these spray adhesives do not allow you to reposition your artwork, so you only get one chance to get it right.