How to Assemble Canvas Floater Frames - Wood
Step by step instructions for assembling a canvas floater wood frame
Floater frame package contents
- The Floater Frame
- 6 Offset Clips and Screws (frames 20" x 24" and smaller); or 12 Offset Clips and Screws (frames larger than 20" x 24")
- One Hanging kit, which includes wire, screws, screw hole hangers and wall bumpers
Guide
Position the canvas
Place your stretched canvas face down on a flat surface. If your canvas is shorter than the rabbet of the floater frame, place it face down on something that will raise it enough without obstructing the floater frame.
Position the floater frame
Place the floater frame face down over the canvas. The back side of the stretcher frame and the back side of the floater frame should be visible, and the floater frame should be resting on the stretcher frame.
Center the canvas
From this position, measure and adjust the visible portion of the stretcher frame until all sides are equal by adjusting the placement of the floater frame over the canvas.
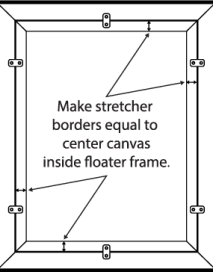
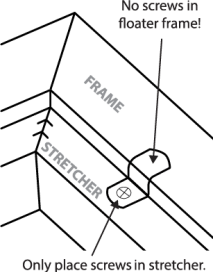
Set top and bottom offset clips
Place the frame in a vertical orientation. Position an offset clip on the bottom center of the floater frame with the screw-hole against the stretcher frame. Use a phillips screwdriver to drive the screw into the stretcher frame, NOT the floater frame. Position a second offset clip on the top center of the floater frame and screw it into the stretcher frame.
Check the vertical and horizontal position of the canvas
Turn the assembly package over and verify that the canvas is still centered vertically. If not, move the clips as needed. Adjust the canvas so that it is centered horizontally.
Set left and right offset clips
Place the assembly package face down again and put an offset clip in the upper right and lower left sides of the floater. As you add these clips verify the canvas is still centered.
Final position check
Turn the assembly package over and do a final verification that the canvas is centered properly. With 4 clips installed you should still be able to rotate the canvas slightly. Make sure the empty space between canvas and inner edge of the floater frame is even all the way around.
Set remaining offset clips
If your frame is 20”x 24” or smaller place the remaining 2 clips as shown on the left in the picture above. If your frame is larger than 20”x 24 place the remaining 8 clips as shown on the right in the picture above.
Prepare for hanging
Screw the hangers into the back of the stretcher frame. Attach the hanging wire to the hangers and tie off. Place a wall bumper protector on each lower corner of the floater frame.
Display
Hang your beautifully floated canvas art!